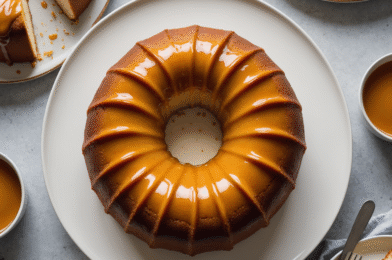
Caramel Cream Cheese Pound Cake
Welcome to the world of decadent desserts with this Caramel Cream Cheese Pound Cake. A perfect blend of creamy and sweet, this cake offers a unique twist on the classic pound cake with the addition of cream cheese and caramel.
(Source: Serious Eats)
Why You’ll Love This
This cake is loved for its rich, moist texture and the irresistible flavor combination of caramel and cream cheese. It's perfect for celebrations or a cozy afternoon treat.
Servings: 12 Prep: 30 min Cook: 90 min Total: 120 min Calories/serving (approx.): 450
Ingredients
- 225g (2 sticks) unsalted butter, softened
- 225g (8 oz) cream cheese, softened
- 400g (2 cups) granulated sugar
- 5 large eggs
- 1 teaspoon vanilla extract
- 300g (2 1/2 cups) all-purpose flour
- 1/2 teaspoon baking powder
- 1/2 teaspoon salt
- 150g (3/4 cup) caramel sauce, divided
- 50g (1/4 cup) light brown sugar
- 1/2 teaspoon ground cinnamon
- 1/4 teaspoon ground nutmeg
- 60ml (1/4 cup) whole milk
- 60ml (1/4 cup) sour cream
- 1 tablespoon lemon juice
- 2 teaspoons vanilla bean paste
- Powdered sugar, for dusting
Ingredient Notes (What & Why)
- Ensure all refrigerated ingredients are at room temperature before starting. (Source: Bon Appétit)
- Use high-quality caramel sauce for the best flavor. (Source: FDA)
- Substitute vanilla bean paste with vanilla extract if unavailable. (Source: USDA)
Equipment
- 10-inch bundt pan
- Electric mixer
- Large mixing bowl
- Medium mixing bowl
- Sifter
- Rubber spatula
- Cooling rack
- Measuring cups and spoons
- Skewer or toothpick
- Wire rack
- Knife for slicing
Timing & Temperature Guide
- Preheat oven to 160°C (325°F) for even baking.
- Bake the cake for approximately 80-90 minutes.
- Check doneness at 80 minutes with a skewer or toothpick.
- Cool the cake in the pan for 15 minutes post-baking.
- Allow the cake to cool completely on a wire rack before serving.
- Store the cake in an airtight container at room temperature.
- Reheat slices in the microwave for 10-15 seconds if desired.
- If freezing, allow the cake to cool completely before wrapping.
Step-by-step Instructions
- Preheat your oven to 160°C (325°F) and grease a 10-inch bundt pan. (Source: King Arthur Baking)
- In a large bowl, cream together the butter, cream cheese, and granulated sugar until light and fluffy, about 5 minutes. (Source: BBC Good Food)
- Add eggs one at a time, mixing well after each addition. Stir in the vanilla extract.
- In another bowl, sift together flour, baking powder, and salt.
- Gradually add the dry ingredients to the wet mixture, alternating with milk and sour cream, starting and ending with the flour mixture.
- Mix in the lemon juice, vanilla bean paste, and 100g (1/2 cup) of caramel sauce until just combined.
- In a small bowl, combine brown sugar, cinnamon, and nutmeg. Sprinkle into the batter, folding gently to create a swirl effect.
- Pour the batter into the prepared bundt pan and spread evenly.
- Bake for 80-90 minutes or until a skewer inserted into the center comes out clean.
- Allow the cake to cool in the pan for 15 minutes before turning out onto a wire rack to cool completely.
- Drizzle the remaining caramel sauce over the cooled cake.
- Dust with powdered sugar before serving.
- Slice into pieces and enjoy with a warm beverage.
- Store leftovers in an airtight container at room temperature for up to 3 days.
Culinary Science Notes
- Cream cheese adds moisture and a slight tang to the cake, enhancing the flavor profile.
- Butter and sugar creaming helps incorporate air, leading to a lighter cake texture.
- Alternating dry and wet ingredients prevents overmixing and ensures a tender crumb.
- The acidity from lemon juice and sour cream reacts with baking powder for a good rise.
- Caramel adds a complex sweetness and moisture to the cake.
- Brown sugar contributes to a deeper flavor and a slightly chewy texture.
- Room temperature ingredients blend more uniformly, preventing curdling.
- Baking at a lower temperature ensures even cooking and prevents a dry exterior.
Pro Tips
- Ensure your oven is fully preheated before baking for even results.
- Use a bundt pan with a non-stick coating to prevent sticking.
- Avoid overmixing the batter to keep the cake tender.
- Check for doneness with a skewer or toothpick inserted into the center.
- Let the cake cool in the pan for 15 minutes to prevent breakage.
- For a richer flavor, consider using homemade caramel sauce.
- If the cake browns too quickly, cover it loosely with foil.
- Use a serrated knife for clean slices.
- Serve with a dollop of whipped cream for added indulgence.
- For a decorative touch, garnish with toasted pecans.
- Adjust the amount of caramel sauce based on personal preference.
- Consider adding a pinch of sea salt to the caramel for a salted caramel version.
Variations
- Add 100g (1/2 cup) chopped pecans for a nutty flavor.
- Use a chocolate glaze instead of caramel for a different twist.
- Incorporate 100g (1/2 cup) mini chocolate chips into the batter.
- Replace caramel with a fruit compote for a fruity version.
- Try adding a tablespoon of espresso powder to enhance the flavor.
- Swap all-purpose flour with almond flour for a nutty texture.
- Mix in some orange zest for a citrusy hint.
- Use maple syrup instead of caramel for a fall-inspired cake.
- Add a teaspoon of ground ginger for a spiced version.
- Top with a cream cheese glaze instead of caramel for extra tang.
- Include 50g (1/4 cup) of toasted coconut in the batter.
- Experiment with different spices like cardamom or allspice.
Substitutions
- Replace butter with margarine for a dairy-free option.
- Use a gluten-free flour blend instead of all-purpose flour.
- Swap granulated sugar with coconut sugar for a deeper flavor.
- Substitute cream cheese with a non-dairy cream cheese alternative.
- Use almond milk instead of whole milk for a lactose-free version.
- Replace sour cream with Greek yogurt for a lighter cake.
- Try honey or agave syrup instead of sugar for a natural sweetener.
- Use a flax egg instead of regular eggs for a vegan adaptation.
- Opt for cashew cream instead of sour cream for a nutty twist.
- Replace vanilla extract with almond extract for a different aroma.
- Use date syrup as a natural sweetener in place of caramel.
- Try buttermilk instead of milk for a tangy flavor.
Dietary Adaptations
- For a gluten-free version, use a gluten-free flour blend.
- To make it dairy-free, substitute butter and cream cheese with non-dairy alternatives.
- For a vegan option, use flax eggs and non-dairy milk.
- To reduce sugar, replace with a natural sweetener like stevia.
- Use almond flour for a grain-free adaptation.
- Replace caramel with a sugar-free alternative for a low-sugar version.
- Opt for coconut milk instead of whole milk for a nutty flavor.
- For a paleo version, use coconut sugar and almond flour.
Serving Suggestions & Menu Ideas
- Serve with freshly brewed coffee or tea for a delightful pairing.
- Top with a scoop of vanilla ice cream for an indulgent dessert.
- Pair with a glass of dessert wine like Moscato for a luxurious treat.
- Serve with fresh berries to balance the cake’s sweetness.
- Offer alongside a cheese board for an elegant gathering.
- Dust with extra powdered sugar for a decorative finish.
- Garnish with mint leaves for a fresh touch.
- Drizzle with additional caramel sauce for extra decadence.
- Pair with a fruit salad for a refreshing contrast.
- Offer alongside a selection of nuts for a crunchy complement.
Menu Ideas
- Include in a dessert buffet for special occasions.
- Pair with savory snacks for a balanced afternoon tea.
- Serve as a centerpiece at a brunch gathering.
- Offer as a sweet option at a potluck.
- Include in a holiday dessert spread.
- Pair with a selection of cheeses for a sophisticated dessert course.
- Serve as a sweet ending to a formal dinner party.
- Include in a gift basket for a thoughtful homemade gift.
Seasonal Variations
- In spring, add fresh berries for a burst of flavor.
- For summer, serve with a dollop of whipped cream and sliced peaches.
- In fall, incorporate spices like cinnamon and nutmeg.
- For winter, pair with warm spiced cider for a cozy treat.
- Use seasonal fruits like apples or pears in the caramel sauce.
- Incorporate pumpkin puree for a festive autumn twist.
- Add cranberries for a holiday-inspired cake.
- Use blood oranges for a winter citrus variation.
Troubleshooting & Common Mistakes
- If the cake is too dense, ensure all ingredients are at room temperature.
- Prevent sticking by thoroughly greasing and flouring the bundt pan.
- Check oven temperature with an oven thermometer for accuracy.
- If the cake is too dry, check for doneness a few minutes early.
- Avoid overbaking by setting a timer and checking the cake regularly.
- If the cake doesn’t rise, ensure baking powder is fresh.
- Prevent a cracked top by baking at the correct temperature.
- If the cake is too sweet, adjust the caramel sauce quantity.
- Avoid a gummy texture by not overmixing the batter.
- For uneven baking, rotate the pan halfway through cooking.
- If the cake is hard, ensure correct measurements of flour.
- To prevent collapsing, cool the cake before removing from the pan.
- Overmixing the batter leads to a dense texture.
- Not creaming butter and sugar long enough affects the cake’s lightness.
- Using cold ingredients can cause uneven mixing and texture.
- Skipping the preheat step results in uneven baking.
- Opening the oven door too often can cause the cake to sink.
- Incorrect pan size affects baking time and texture.
- Not allowing the cake to cool properly can cause breakage.
- Using expired baking powder results in poor rise.
- Not sifting flour can lead to lumps in the batter.
- Forgetting to fold in caramel sauce means uneven flavor distribution.
Make-Ahead, Storage & Reheating
This cake can be made a day in advance. Store in an airtight container at room temperature and drizzle with caramel sauce just before serving.
Store the cake in an airtight container at room temperature for up to 3 days. To extend freshness, refrigerate for up to 5 days.
Reheat individual slices in the microwave for 10-15 seconds to enjoy warm. Avoid reheating the entire cake to prevent drying out.
Freezing, Leftovers & Scaling
Wrap the cooled cake tightly in plastic wrap, then aluminum foil. Freeze for up to 3 months.
Thaw at room temperature before serving.
Creative Leftover Ideas
- Crumb leftover cake for a dessert topping.
- Use in a trifle with layers of cream and fruit.
- Create cake pops by mixing with cream cheese frosting.
- Toast slices and serve with butter for a breakfast treat.
- Use as a base for a bread pudding.
- Make French toast with leftover slices.
- Layer with yogurt and fruit for a parfait.
- Crush and use as a pie crust base.
To scale the recipe, adjust ingredient quantities proportionally. For larger cakes, increase baking time and check for doneness with a skewer.
Budget Notes & Substitutions
Using high-quality caramel and real vanilla can increase costs, but the flavor payoff is significant. Consider homemade caramel to save on expenses.
Nutrition Facts
- Calories: 450 per serving (approximate)
- Total Fat: 22g
- Saturated Fat: 13g
- Cholesterol: 110mg
- Sodium: 280mg
- Total Carbohydrates: 57g
- Dietary Fiber: 1g
- Sugars: 38g
- Protein: 6g
- Vitamin D: 10%
- Calcium: 6%
- Iron: 10%
- Potassium: 4%
- Phosphorus: 8%
- Magnesium: 4%
Background & Origins
The pound cake originated in Europe in the early 18th century, traditionally made with a pound each of flour, butter, sugar, and eggs. Over time, variations like the inclusion of cream cheese and caramel emerged, adding richness and flavor complexity.
Glossary of Terms
- Creaming
- The process of beating butter and sugar together until light and fluffy, incorporating air.
- Bundt Pan
- A round baking pan with a central tube, used for making ring-shaped cakes.
- Caramel
- Sugar that is heated until it browns, used to impart a sweet, nutty flavor.
- Sifting
- The process of passing dry ingredients through a sieve to break up clumps and aerate.
- Vanilla Bean Paste
- A thick, syrupy form of vanilla extract with specks of vanilla bean seeds.
- Zest
- The outer colored skin of citrus fruits, used for flavoring.
- Flax Egg
- A vegan egg substitute made from ground flax seeds and water.
- Serrated Knife
- A knife with a scalloped edge, ideal for cutting through foods with a hard exterior and soft interior.
FAQs
- Can I use low-fat cream cheese?
- Yes, but it may alter the texture and richness of the cake.
- How do I prevent the cake from sticking to the pan?
- Grease the bundt pan thoroughly with butter and flour.
- Is it necessary to use a bundt pan?
- No, but it helps achieve the cake’s traditional shape. A tube pan can be an alternative.
- Can I use homemade caramel?
- Absolutely, homemade caramel can enhance the flavor.
- What if I don't have vanilla bean paste?
- Substitute with an equal amount of vanilla extract.
- How can I tell when the cake is done?
- A skewer inserted into the center should come out clean.
- Can I add nuts to the batter?
- Yes, chopped nuts like pecans or walnuts can be added for texture.
- Can I use a different type of sugar?
- Coconut sugar or brown sugar can be used, but will affect the flavor.
- Why is my cake too dense?
- Ensure ingredients are at room temperature and do not overmix the batter.
- How should I store the cake?
- In an airtight container at room temperature for up to 3 days.
- Can I freeze the cake?
- Yes, wrap tightly and freeze for up to 3 months.
- What can I serve with this cake?
- Fresh berries, whipped cream, or a scoop of ice cream complement it well.
Ingredients
- 225g (2 sticks) unsalted butter, softened
- 225g (8 oz) cream cheese, softened
- 400g (2 cups) granulated sugar
- 5 large eggs
- 1 teaspoon vanilla extract
- 300g (2 1/2 cups) all-purpose flour
- 1/2 teaspoon baking powder
- 1/2 teaspoon salt
- 150g (3/4 cup) caramel sauce, divided
- 50g (1/4 cup) light brown sugar
- 1/2 teaspoon ground cinnamon
- 1/4 teaspoon ground nutmeg
- 60ml (1/4 cup) whole milk
- 60ml (1/4 cup) sour cream
- 1 tablespoon lemon juice
- 2 teaspoons vanilla bean paste
- Powdered sugar, for dusting
Instructions
- Preheat your oven to 160°C (325°F) and grease a 10-inch bundt pan.
- In a large bowl, cream together the butter, cream cheese, and granulated sugar until light and fluffy, about 5 minutes.
- Add eggs one at a time, mixing well after each addition. Stir in the vanilla extract.
- In another bowl, sift together flour, baking powder, and salt.
- Gradually add the dry ingredients to the wet mixture, alternating with milk and sour cream, starting and ending with the flour mixture.
- Mix in the lemon juice, vanilla bean paste, and 100g (1/2 cup) of caramel sauce until just combined.
- In a small bowl, combine brown sugar, cinnamon, and nutmeg. Sprinkle into the batter, folding gently to create a swirl effect.
- Pour the batter into the prepared bundt pan and spread evenly.
- Bake for 80-90 minutes or until a skewer inserted into the center comes out clean.
- Allow the cake to cool in the pan for 15 minutes before turning out onto a wire rack to cool completely.
- Drizzle the remaining caramel sauce over the cooled cake.
- Dust with powdered sugar before serving.
- Slice into pieces and enjoy with a warm beverage.
- Store leftovers in an airtight container at room temperature for up to 3 days.
- Ensure your oven is fully preheated before baking for even results.
- Use a bundt pan with a non-stick coating to prevent sticking.
- Avoid overmixing the batter to keep the cake tender.
- Check for doneness with a skewer or toothpick inserted into the center.
- Let the cake cool in the pan for 15 minutes to prevent breakage.
- For a richer flavor, consider using homemade caramel sauce.
- If the cake browns too quickly, cover it loosely with foil.
- Use a serrated knife for clean slices.
- Serve with a dollop of whipped cream for added indulgence.
- For a decorative touch, garnish with toasted pecans.
- Adjust the amount of caramel sauce based on personal preference.
- Consider adding a pinch of sea salt to the caramel for a salted caramel version.